AWS API GATEWAY: A PRACTICAL, STEP-BY-STEP GUIDE
🔗 What Is API Gateway?
AWS API Gateway is the entry point for your backend APIs. It securely connects your frontend apps (web/mobile) to AWS Lambda, EC2, ECS, or on-premise systems. Think of it as a "front door" that controls who can enter, how fast, and where they go.
API Types
| Type | Description | Best For |
|---|---|---|
| HTTP API | Modern, cheaper, faster | CRUD / serverless APIs |
| REST API | Full-featured (usage plans, caching) | Complex, enterprise APIs |
| WebSocket API | Real-time, 2-way communication | Chat apps, live dashboards |
🔧 Step 1: Create Your First API (Console)
- Go to API Gateway → Create API → HTTP API.
- Choose Build.
- Add an Integration (e.g., AWS Lambda or HTTP backend).
-
Create routes like:
-
GET /notes POST /notes- Create a Deployment and Stage (e.g.,
dev). - Copy your Invoke URL and test in Postman.
Example: https://abc123.execute-api.us-east-1.amazonaws.com/notes
📦 Step 2: Routes and Integrations
A route defines what happens when someone calls /notes.
Example:
- Route:
GET /notes - Integration: Lambda function
notes_get
Console Steps:
- Go to Routes → Create.
- Enter
/notesand choose methodGET. - Choose Integration: Lambda →
notes_get. - Deploy to stage
dev.
🚶 Step 3: Stages & Variables
Stages represent environments like dev, test, prod.
Example:
- Stage:
dev(testing) - Stage:
prod(live users)
You can add Stage Variables, e.g.:
ENV = devDB_URL = mydb-dev.example.com
⏱️ Step 4: Throttling (Rate & Burst)
Control request limits to protect your backend.
Example:
- Rate = 100 req/sec
- Burst = 200 req/sec
Console Steps:
- Stages → dev → Throttling.
- Set Rate and Burst limits.
- Save.
If clients exceed limits, API Gateway returns 429 Too Many Requests.
🌐 Step 5: Enable CORS
Without CORS, browsers will block frontend requests from different domains.
Example:
Your frontend at https://imjoy.me calls your API at https://api.imjoy.me.
Console Steps:
- In API Gateway, go to CORS settings.
- Allowed origins:
https://imjoy.me - Allowed methods:
GET, POST, DELETE - Allowed headers:
Content-Type, Authorization - Save and redeploy.
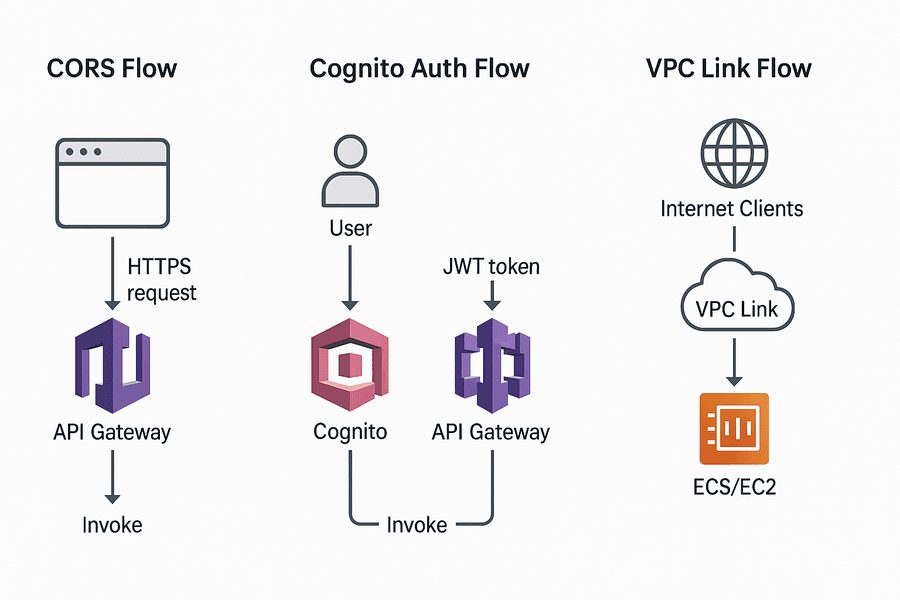
📘 Diagram: CORS Flow
+------------+        +------------------+        +-------------------+
|  Browser   | -----> |  API Gateway     | -----> |  Lambda Backend   |
| (Frontend) | <----- | (CORS Response)  | <----- | (Business Logic)  |
+------------+        +------------------+        +-------------------+
When the browser sends a preflight OPTIONS request, API Gateway replies with headers like:
Access-Control-Allow-Origin: https://imjoy.me
Access-Control-Allow-Methods: GET,POST,DELETE
Access-Control-Allow-Headers: Content-Type,Authorization
🔐 Step 6: Authorization
Secure your API using AWS Cognito or Lambda authorizers.
Options:
NONE= publicIAM= internal AWS callsCOGNITO_USER_POOLS= validate JWT tokensLAMBDA= custom logic (Auth0, DB checks)
Console Steps:
- Authorizers → Create.
- Choose Cognito User Pool.
- Token source:
Authorizationheader. - Attach to route (e.g.,
GET /notes). - Redeploy.
Example JWT Header
Authorization: Bearer eyJraWQiOiJ...<token>...
📘 Diagram: Auth Flow
+-----------+       +---------------+       +-------------+       +-------------+
|  User     | --->  | Cognito Login | --->  | API Gateway | --->  | Lambda      |
| (Frontend)|       |  (JWT Token)  |       |  Authorizer |       |  Backend    |
+-----------+       +---------------+       +-------------+       +-------------+
- User logs in with Cognito and gets a JWT.
- Frontend sends request with JWT in
Authorizationheader. - API Gateway validates token before invoking Lambda.
🔥 Step 7: Custom Domain
Change default AWS URL to a friendly one.
Console Steps:
- Custom Domain Names → Create.
- Enter:
api.imjoy.me. - Select TLS certificate from ACM.
- Add API mapping to your stage.
- Update DNS (Route 53) with an alias record to API Gateway domain.
Result: https://api.imjoy.me/notes
🛠 Step 8: VPC Link (Private Backend)
Connect API Gateway to private resources in a VPC (e.g., ALB, ECS, or EC2).
Console Steps:
- VPC Links → Create.
- Select subnets in your private VPC.
- Integration → Create: choose Private Resource via VPC Link.
- Attach to route (e.g.,
/internal). - Redeploy.
📘 Diagram: VPC Link
+------------+      +----------------+      +-------------------+
|  Internet  | ---> | API Gateway    | ---> |  ALB (Private)    |
|  Clients   |      | (VPC Link)     |      |  ECS / EC2 App    |
+------------+      +----------------+      +-------------------+
🔄 Step 9: Export & Reimport APIs
Export (Console):
- Stages → dev → Export.
- Choose format: OpenAPI 3.
- Download JSON/YAML.
Reimport:
- Create API → Import from OpenAPI.
- Upload file.
- Review and create.
📊 Step 10: Monitor Metrics & Logs
- Enable Logs: Stages → dev → Logging → Enable access logs.
- View in CloudWatch: Latency, 4XX/5XX errors.
- Enable X-Ray: Trace end-to-end requests.
📅 Pricing Snapshot
| API Type | Cost per 1M req | Free Tier |
|---|---|---|
| HTTP API | ~$1.00 | 1M / month |
| REST API | ~$3.50 | 1M / month |
| WebSocket | ~$1.00 | 1M messages |
Data Transfer: ~$0.09/GB to internet.
Pro Tip: Create AWS Budgets to avoid surprise bills.
🎯 Summary Table
| Feature | Purpose | Example | Console Path |
|---|---|---|---|
| Routes | Define endpoints | GET /notes |
API → Routes |
| Integrations | Connect backend | Lambda/HTTP | API → Integrations |
| CORS | Allow frontend calls | https://imjoy.me |
API → CORS |
| Auth | Secure access | Cognito, JWT | API → Authorizers |
| Stages | Versioning | dev, prod |
API → Deployments |
| VPC Link | Private access | ALB/ECS | API → VPC Links |
| Export/Reimport | API migration | OpenAPI spec | API → Stages → Export |
🔍 Final Thoughts
AWS API Gateway may look overwhelming at first, but once you break it down into Routes, Integrations, Stages, CORS, and Auth, it becomes a powerful, low-cost serverless gateway for your apps.